
Getting around
Sign in, find your way around the portal, and learn the handful of patterns every page shares — so the rest of this guide is just detail.
The VoxaLink portal is where you run your phone system: the people, the numbers, the way calls are routed, and the record of what happened on every call. This chapter is the orientation. Read it once and the other chapters become quick reference, because almost every page in the portal is built from the same few parts — once you recognise them, nothing is a surprise.
If you have never opened the portal before, start here. If you are looking for one specific thing, skip ahead — but the section How a settings page works below is worth two minutes, because it explains the layout you will see on every editor in the product.
Signing in
Open portal.voxalink.cloud in a browser and sign in with your email address and password. These are the credentials your administrator set up for you; they are not the same as the password on your desk phone.
- Stay signed in keeps your session alive on this browser so you are not asked again every visit. Leave it off on shared or public computers.
- Forgot your password? is on the sign-in screen. It emails a reset link to the address on your account.
- There are separate sign-ins for the admin portal (managing the phone system — this guide) and the user portal (your own extension only). If you land on a screen that only shows your own settings, you are in the user portal; see Admin view vs User Mode at the end of this chapter.
If your sign-in is rejected and you are sure the password is right, the account may be locked after repeated attempts, or your administrator may not have finished setting it up. Wait a few minutes and try again, or ask your administrator to check.
The workspace at a glance
Once you are in, every screen shares the same frame: a top bar across the top, the main menu down the left, and the page itself filling the rest.
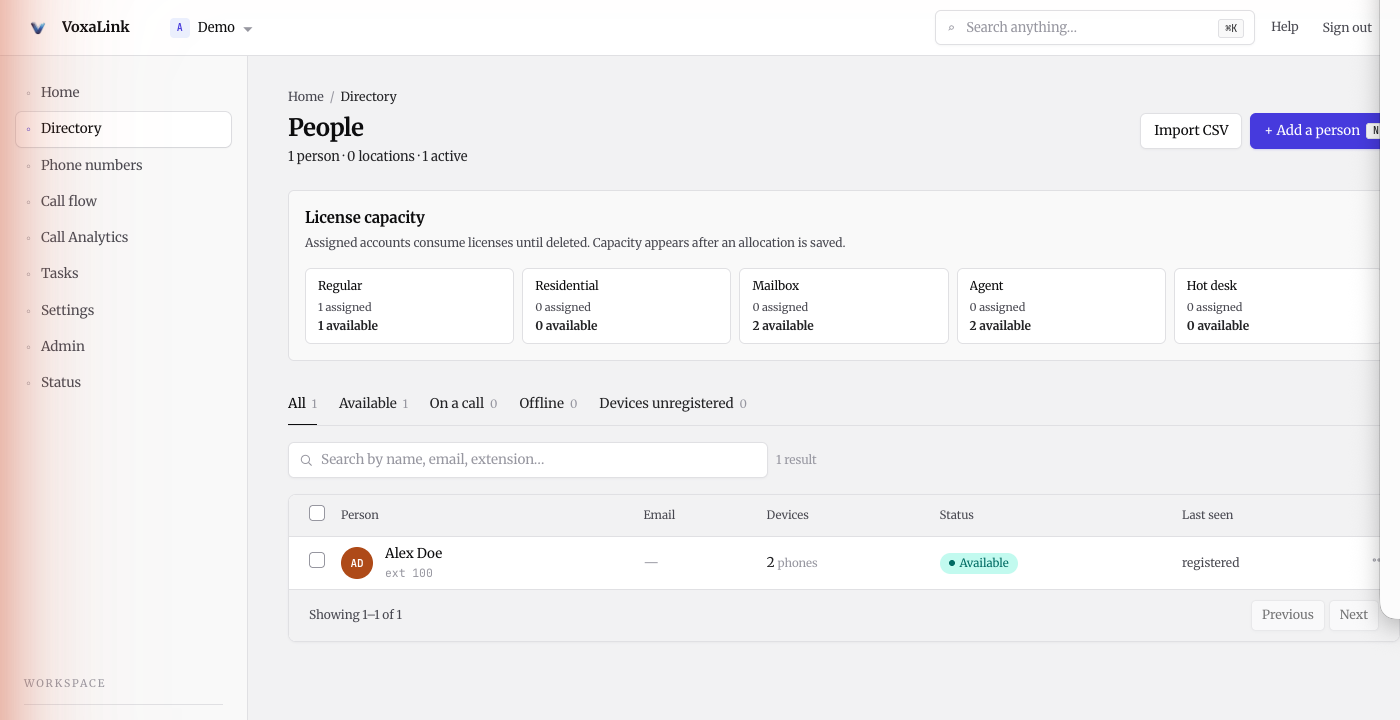
The top bar
From left to right:
- The product logo — clicking it always returns you to the Home dashboard, from anywhere.
- The tenant chip — shows which tenant (your organisation's phone system) you are working in. If your login manages more than one tenant, click it to switch between them. Everything you see and change applies to the tenant named here, so glance at it before making changes if you manage several.
- Search anything — a single search box (keyboard shortcut ⌘ K on a Mac, Ctrl K on Windows) that looks across settings, people, and numbers at once. It is the fastest way to jump somewhere when you know the name or number but not the menu it lives under.
- Help — links back into this support site.
- Sign out — ends your session. Use it on any computer that is not your own.
- Your account menu — the avatar at the far right, for your own profile and signing out.
The main menu
The left menu is the map of the whole portal. There are nine sections, and this guide has one chapter per section in the same order:
| Menu item | What it is for | Chapter |
|---|---|---|
| Home | A dashboard of how your phones have been running — calls, answer rate, talk time. | 02 |
| Directory | The people on your phone system: their extensions, devices, mailboxes, and permissions. | 03 |
| Phone numbers | The external numbers (DIDs) you own, and the dial plans that route outbound calls. | 04 |
| Call flow | How inbound calls are handled — auto attendants, ring groups, queues, conferences, paging, park, and the time-based switches that gate them. | 05 |
| Call Analytics | A searchable record of every call, with recordings, transcripts, and quality scores. | 06 |
| Settings | Tenant-wide defaults — caller IDs, voicemail, music on hold, email delivery, and more. | 07 |
| Admin | The plumbing — webhooks, devices, locations, button templates, and CRM integrations. | 08 |
| Status | A live view of what is happening right now — active calls, registered devices, graphs. | 09 |
Click a section and, where it has more than one page, its sub-pages appear indented beneath it. The section you are in stays highlighted, so you always know where you are.
Some menus only appear if your login has permission to see them, and some features are switched off for your tenant. If a menu item described in this guide is missing for you, it has been hidden for your account rather than removed — ask your administrator if you need it.
At the very bottom of the menu, the workspace footer shows your organisation's name and the system address it lives on. You rarely need it, but it is handy when you contact support — it tells us exactly which system you are on.
How a settings page works
Most of the portal is either a list (people, numbers, queues — things you have several of) or an editor (the settings for one of those things). They look the same everywhere, so it is worth learning the shape once.
Lists
A list page shows everything of one kind — for example, every person in the Directory. Lists share a few habits:
- A search or filter box at the top to narrow a long list by name, number, or status.
- Status tabs or chips (such as All, Available, Offline) that filter the list with one click.
- An add button at the top right — + Add a person, + New auto attendant, and so on — to create a new one.
- Clicking any row opens that item's editor.
Editors
Open any item and you get an editor built from three parts:
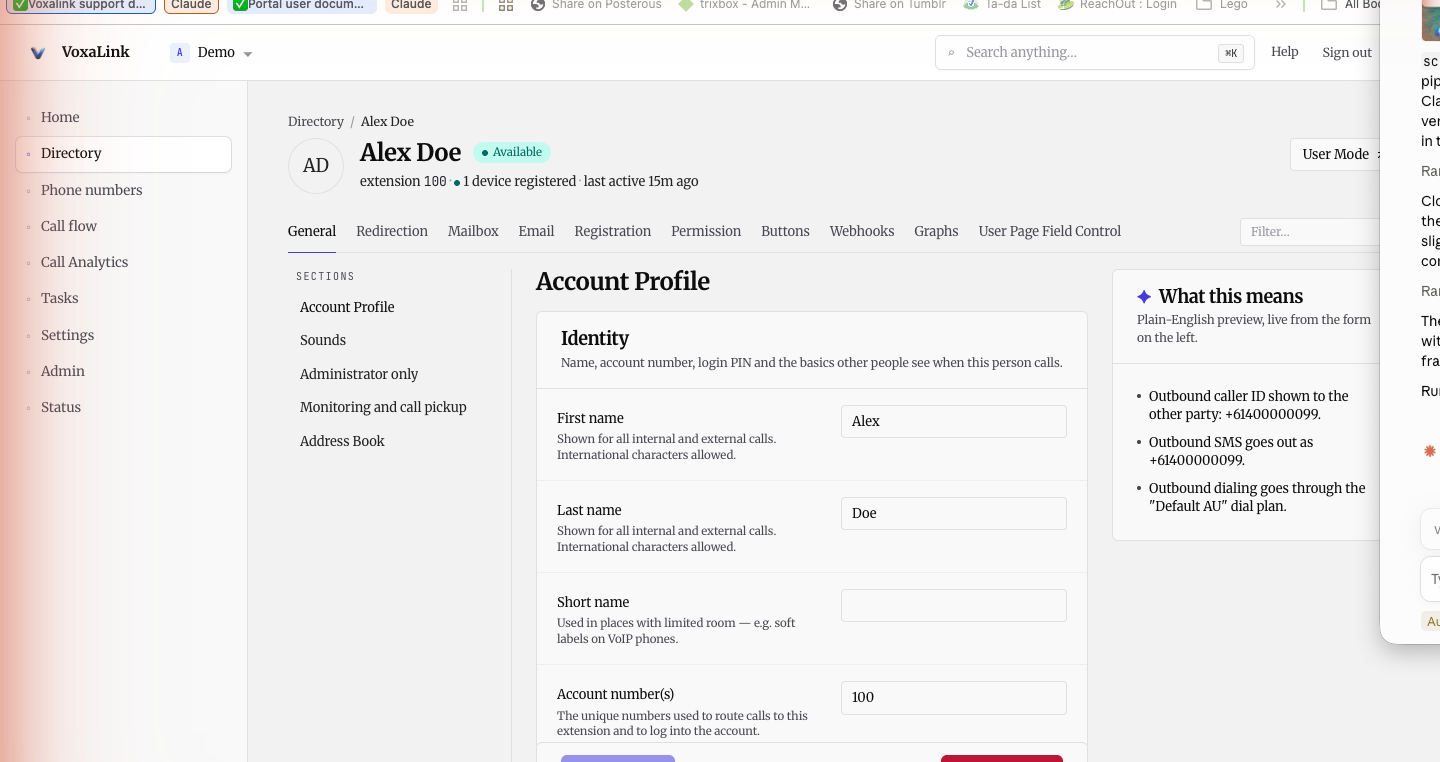
- Tabs across the top group the settings — for an extension these are General, Redirection, Mailbox, and so on. A Filter box beside the tabs lets you search for a setting by name when you are not sure which tab it is on.
- Sections down the left break a busy tab into smaller groups, so you can jump straight to the part you want instead of scrolling.
- "What this means" on the right is a plain-English, live preview of what your settings will actually do — for example, "Outbound caller ID shown to the other party: +61…". It updates as you change the form, so you can see the effect of a change before you save it. When you are unsure whether a setting does what you expect, watch this panel.
At the bottom of every editor is the action bar:
- Save changes writes your edits. Until you click it, nothing is applied — and the button stays greyed out (reading No changes) until you have actually changed something.
- Reset discards your unsaved edits and returns the form to how it was.
- Delete removes the item entirely. It is deliberately set apart, in red, on the right.
Because nothing is saved until you click Save changes, you can open any editor and look around safely. Navigating away from an editor with unsaved changes will lose them — so save before you leave.
Breadcrumbs
Just under the page title, a breadcrumb trail (Home / Directory / Alex Doe) shows where you are and lets you step back up a level. It is the reliable way back out of a deep editor.
Calm and Full
On the Home dashboard you will see a Calm / Full toggle. Calm shows the essentials at a glance; Full expands the same screen with more detail and extra panels. Pick whichever suits how closely you watch your numbers — it only changes how much is shown, never the underlying data. See Home for what each view includes.
Admin view vs User Mode
This guide covers the admin portal — the full view, where you manage the whole tenant. There is also a user portal, a stripped-down view where an individual only sees and controls their own extension: their voicemail, call forwarding, and phone buttons.
When you open a person in the Directory, a User Mode button lets you jump into that person's own view — useful for seeing exactly what they see, or for setting something up on their behalf. What an individual is allowed to change for themselves in the user portal is governed by User Page Field Control, covered in Directory.
With the frame, the menu, and the editor pattern in hand, the rest of this guide is detail.
Next: Home — the dashboard the portal opens on.